Showing posts with label 3D. Show all posts

Sunday, June 16, 2013

Happy Father's Day (3D die cut card)

My dad wears a ratty, tattered vest and even though I've given him new ones, he still keeps wearing the old one anyway. He doesn't wear a bow tie, but I think he'll get a kick out of this card anyway.


I've been experimenting in the realm of "printables" and this is made of 3 pieces - the bow tie, shirt, and vest, cut from 1 sheet of letter-size paper on 80lb cover stock. It was fun to shade the bow tie and give it a sense of 3D while really giving a 3D shape. Details in the buttons and stitching was a cinch to print. It helps keep the vest flaps down when the card is closed. I've written my message under the shirt, which is removable.


Somehow I quite like the back as well simply for its minimalism. He's a man of little words, so I'll see what kind of reaction I get during tonight's dinner.


If you'd like to cut this card by hand, I'm selling a "printable" and "cuttable" file on Craftsy.


Wednesday, May 8, 2013

Happy Mother's Day Card (die cut tea cup)


My mom has kept and treasured the handmade cards I crafted for her as a child. There's no better #1 fan than the person who has reassured my fears and advised me to do what made me happy.

I tend to be very structured in my designs, even though I have always admired more free flowing pieces. So I'm trying to push beyond my comfort zones and this is my first experiment.


I sketched my ideas, imagining how the layers of colors will come together. Stardream and Daiso paper is wonderful to cut even with a dullish blade and somewhat fine lines, because there aren't any residual fibers of paper sticking out in tight corners.


It's amazing how an idea can end up being so much more labor intensive than I imagined. The finer lines makes a smaller area for gluing, so the flowers simply take more time to secure. The graphic designer in me wants to simply print the color, even though I enjoy the look of layered paper. However, I can't dispute how well it looks overall when it matches the teacup perfectly.


I'm still working out the kinks on my 3D teacup, but I like how it comes off the page. I wanted to make the "tea" shiny and wet looking so thought of using some glitter nail polish.

Thursday, April 18, 2013

DIY Flocking


I've been seeing flocking all over the stores (and some ingeniously decorated nails). It's kind of like colored, fluffy, cotton candy, but in teeny pieces. I didn't want to buy more things, so my first thought was can I make my own? Yes I can!

I borrowed the microfine shredder from the kitchen, wadded up some paper scraps from Daiso, and shredded away. In case I didn't cover everything, I used the same color yellow as a backing, covered it in glue and dipped into my paper flocking (tweezers are helpful!). Then I glued it to my daisy flower, which then decorated my 3D cakes.


Wednesday, April 17, 2013

3D Cake - Daisy Birthday Card


Ever get those birthday cakes topped with plastic signage? I kind of wanted to replicate that for this birthday girl's card. I stacked the words 4 times out of card stock to make my own chipboard, just like I did for the LOVE sculpture. This time I made the top layer out of a lighter green so when it's viewed from the side, it gives another dimension - just a little something different. I stuck foam squares near the top so they stick up, then glued the bottom part behind the daisies.


Her fave color is yellow and since my original cake was too short to let me go nuts on the decorating,  I made it twice as tall. I always place my elements on my card to assess the spacing before gluing permanently. Although I thought everything was well placed, it ended up being lower than I intended when I stood back. So I added the fireworks I used on my Mickey Mouse project to fill the top. I feel like I overdid that too, but ah well, I'll live.

PS, here's a teaser image for my next post, where I'll explain how I made the stamens in the middle - yes, it's paper!


Thursday, April 11, 2013

3D Cake Card with Punched Flowers


My sister in law is always well-dressed, so put together. She is feminine without being girly. I  wanted to give her a 3D birthday cake card that expressed that (I hadn't chosen my greeting yet when I took this photo).


I had so much fun making these flowers after being inspired by Michelle's version. After stepping back I worried I had gone too far and overdid it, but I think I'm just not used to so much adornment, being a tomboy at heart.


I cut some 1/8" quilling strips in half which made them more pliable as I decorated the cake. This let me strew blossoms in a more random way. I used a white felt marker to dot some stamens in the middle of the blossoms.


I dipped the blossoms into Aleene's Tacky Glue and they held fast when applied to the cake. I didn't have to sit there and wait around. I'll be showing how I shaped the blossoms in a following post soon.

Wednesday, April 10, 2013

3D Cake Card by Stephanie Elliott


This is a card made by Stephanie Elliott, who customized my 3D Cake Collection. I love how she customized it with dripping icing and then topped it off with glistening glitter. Here's how she did it:

I love microfine glitter so I layered cardstock with double sided adhesive, stacked the icing designs on the cake, and sent it through the cutter twice – once to cut the design from the adhesive liner, the second time to actually cut the parts from the card stock. The design cut beautifully and, after coloring the icing & cake parts with glitter, assembly was easy (with your great instructions). I used the double sided adhesive only because I wanted to color by selection with glitter. Using that adhesive, though, proved to be incredibly useful in assembly. I completed one card and constructed the box (which is great, by the way). I love how everything turned out.

I cut all of the parts for the first card on a Black Cat Cougar. I cut all of the parts for this last card on a Cameo (can’t let either cutter feel left out). This card is a top fold card with accordion pockets on the inside. There are note cards in each pocket. Again, thank you so much for designing such a wonderful set. I’m already thinking of a dozen events for which your design will be perfect.


OK, so I admit to being just a tad OCD and the way Stephanie has opened up those pockets to show the accordion file holding note cards makes me itch to make something just as organized. However if I were the recipient of this wonderfully coordinated card, I couldn't bear to use them!

When I asked her about the differences between cutting machines she's used, Stephanie went into great detail, describing their fine points and sharing her knowledge. She has been tempted to start a blog to share tutorials and files, but I think she's busy creating gifts to be cherished. She very kindly let me show her work here, and I hope you'll leave a comment for her to read - and hopefully she'll start her blog to share more of her projects! Thank you, Stephanie!

Wednesday, March 27, 2013

3D Cake by Michelle and Kelly


I simply love seeing my designs come to life in another person's hands. It's wonderful to see the same cut file used in different colors and texture than I imagined.

The first card is made by Michelle of Michelle My Belle Creations. It seems so obvious now that the flowers she used was such an ideal choice. I also like the bling she added using sequins in the upper parts of the swoosh.

The second card is by Krafting Kelly of Finding Time to Create. Ah, these are the times I wish I had a ready supply of scrapbook paper in my shelf. I love how she placed the initial right on top of the cake - like one of those special candles. Again - why didn't I think of that?

Thank you for playing with my files, Michelle and Kelly!

Tuesday, March 19, 2013

3D Cake Collection

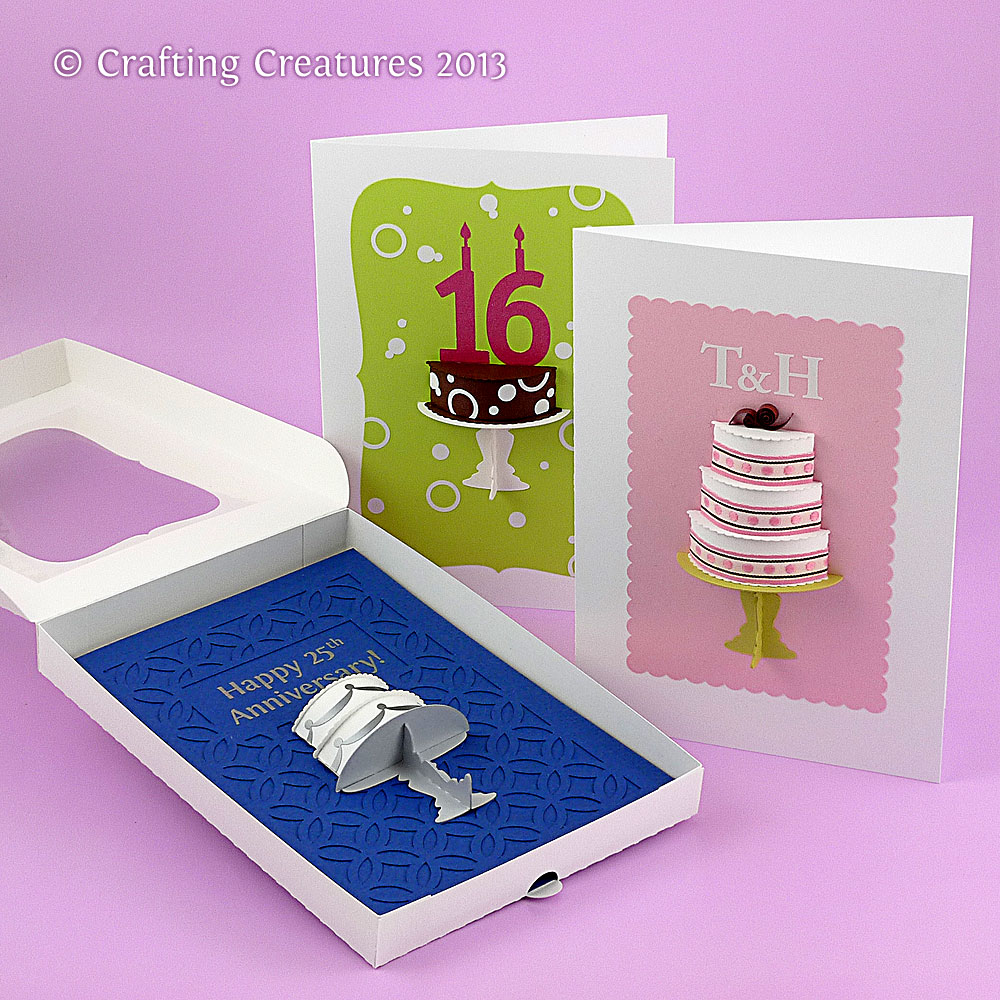
I'm quite excited to offer these 3D paper cakes, easily customizable for a birthday, wedding, or anniversary in my store.


Here's an example of a single layer chocolate cake with white circles icing (I used white vinyl). I've seen many examples of polka dotted icing on cakes, and thought it would great to have a matching background.


Add a second layer of cake on top and some swooshes to make a classic celebratory statement. I designed a subtle backdrop pattern made of diamonds and left a blank plaque above for whatever occasion you need. 

My favorite has to be the 3-tier cake. Somehow the more tiers it has, the more fun it is. I decorated it with ribbon and matched the background using a scalloped edge. The chocolate shavings on top were made of quilling paper, but you can just as easily use any brown paper with 1/8" width.
What cake would be complete without a cake box? I used some scrap plastic left over from some packaging and glued it with Scotch Quick Dry glue. I also added some easy-open tabs so you won't have to struggle prying open a well-fitted box. All the cards are 5x7 inches.
Michelle of MichelleMyBelle Creations made an awesome purple cake with flowers, sequins, and textured backgrounds. I like how she added a bow to the stand which makes it more dimensional.

Please let me know what you think in the comments section!

Wednesday, March 13, 2013

Happy birthday 3D paper cake


Wishing our niece a happy birthday with a bubbly cake. She was into pink for years and now that she's on the brink of becoming a teenager, I thought I'd give one last shout-out to pinkness. Somehow the years of coloring with her made me really aware how well pink and purple go so well together.
The purple confetti and curls on top were made of quilling paper. The text is cut from vinyl. Everything else was cut with my Silhouette die cutter. I designed the 3D cake pattern months ago but got sidelined with a huge project, so I'm relieved to finally re-visit this in time to use it myself.

Sunday, March 10, 2013

Owl Die Cut for ATC Swap


Paper Poet, New Westminster is holding a Meet Up to swap Artist Trading Cards this Friday. This is the first ATC I've ever made. Of course I'd use a combo of die cutting and quilling, and somehow express who I am (a combo of die cutting and quilling). What I like the most is how the owl puffs up simply with a folded half moon on the top of his head. Please leave a comment - I really enjoy your feedback.


Sunday, October 7, 2012

3D Cake Card

Here's an idea I've been toying with – a paper 3D cake. I love the feel ribbon instantly gives to cakes. The chocolate shavings screamed to be made out of quilling strips. The platter/stand is cut from metallic green card stock. I even made a cake box to protect it, since it'll get crushed in an envelope.
Each tier is made separately in case they need to be varying paper stocks representing different flavors. This 3-tier cake is obviously for a wedding, but take away the top 2 and there'll be more room for a message for birthdays or anniversaries.

Thursday, February 2, 2012

Valentine Collection made by Brigit


I've had the pleasure of meeting Brigit on the Make-The-Cut Forum. She volunteered to test my "No Peeking! Boxes" during Christmas on her Zing and was kind enough to try out my Valentine collection as well.

Her thorough feedback was invaluable - especially as I learned that her Zing would cut notches where my lines didn't join - something that didn't show up on my Silhouette. Since scrapbooking is not my forté, I also loved seeing how she envisions my designs. It was her ink pad distressing that showed me how to give my 3D paper balls an extra pop, especially with the speeding arrows. To see more of Brigit's paper projects, visit her blog at: http://irishmist59.blogspot.com/

Thanks so much Brigit!!!

Cecelia

Saturday, January 14, 2012

3D Paper Ball with Hearts and Arrows

Beware of Cupid’s shooting arrows! It was a great discovery my first time to use an ink pad on the edges of my paper ball decorations to add dimension. I realized dragging the ink pad across the arrow would make it appear as if Cupid had just let it fly, especially when it caught on the edges.

Version 1 is easy to put together since it’s a single sheet of paper. Simply use beading wire, fishing line, or string to thread from the bottom hole, then thread each arc at the top. A rolled paper straw in the middle keeps the ball fully inflated. A scalloped circle finishes the top and bottom and the beads are optional. Version 2 allows you to combine two different papers, of course.

Part 4 of upcoming Valentine collection on Etsy.

Sunday, December 11, 2011

Paint a White Christmas


Need snow? Paint yourself a winter wonderland. Daiso sells pearlescent white paint for $2 in a small tube. Use a fine brush, load it up, and let the paint scrape against the edges of your craft project (in this case a party favor box).


Try to make it look like natural snow drift by painting from one direction (so don't coat every edge).


This triangular party favor box is sold on Etsy, along with other dinner party paper decor. Half-moon shaped flaps are on both ends to allow easy access to your stocking stuffer. Perfectly size for biscotti treats.

Thursday, December 1, 2011

I am so thankful for the time everyone offered me on the Make The Cut Forum. Below are some responses I got from my testers and the above photo taken by Brigit. I love the way she inset those panels and inked the edges of the tags - something I've only recently learned about.

Brigit (Zing): I love the design of your bow it's so pretty when put together, I used glue though. The pillow box I just did after the zing plugin and it cut perfectly, I love it, it went together so nicely, here they are.

Laurie (Cricut): have cut out three of the gift card boxes. The perferations work differently on different types of paper. It worked great on a doublesided 12x12 sheet. I used some solid regular card stock and it was much more difficult to fold the end flaps. But all in all they cut out great and are really neat little boxes. Such a great idea.

Pam (Pazzles Inspiration and the Pro software): Your bow worked out fine for me except that sometimes I'm a little fumbled fingered..lol  I mainly  create and design greeting cards and rarely do scrapbooking and when I cut your files, I actually used scrap papers that I had on hand.  I cut the cube box using some GA Pacific White Card from Walmart and for the Pillow Box and Bow I just used some lightweight paper because I think those two items would be better cut from it than from cardstock.  You are more than welcome to use my comments as they are quite nice cutting files!

Monday, October 10, 2011

Tricked your Treat!


Who won the "What's inside the coffin contest?" No body. The answer is fish skeleton! Make no bones about it - I even put the answer in my Etsy listing! Please, no booing! Thank you all for playing! I had a screech :)

One more if you dare? Why couldn't Dracula's wife get to sleep?  Because of his coffin.

Monday, October 3, 2011

Crouching Spider, Hidden Candy


OK so it wasn't hard to guess what was coming, but I hope you've enjoyed the unveiling of my die cut Halloween coffin boxes. This one has a spider web made of black vinyl hidden on the inside of the coffin's lid. A small length of fishing wire is attached to the spider so kids will get an extra hidden surprise as they reach for the goodies inside. I have always loved shiny black on matte, a subtle and entrancing effect.


Here are some of my prototypes. Can anyone guess what's inside? I'll give you a hint - it's white and emaciated. Please be very specific - only FULLY correct guesses will qualify.

I will email a free SVG or DXF spider file to anyone who guesses correctly by next Monday, Oct 10, 2011.

Sunday, October 2, 2011

Knuckles


Pale knuckles grip the coffin's edge... 

my latest trailer for an upcoming die cut bundle for Etsy.

Monday, March 21, 2011

Silhouette Pen Comparison

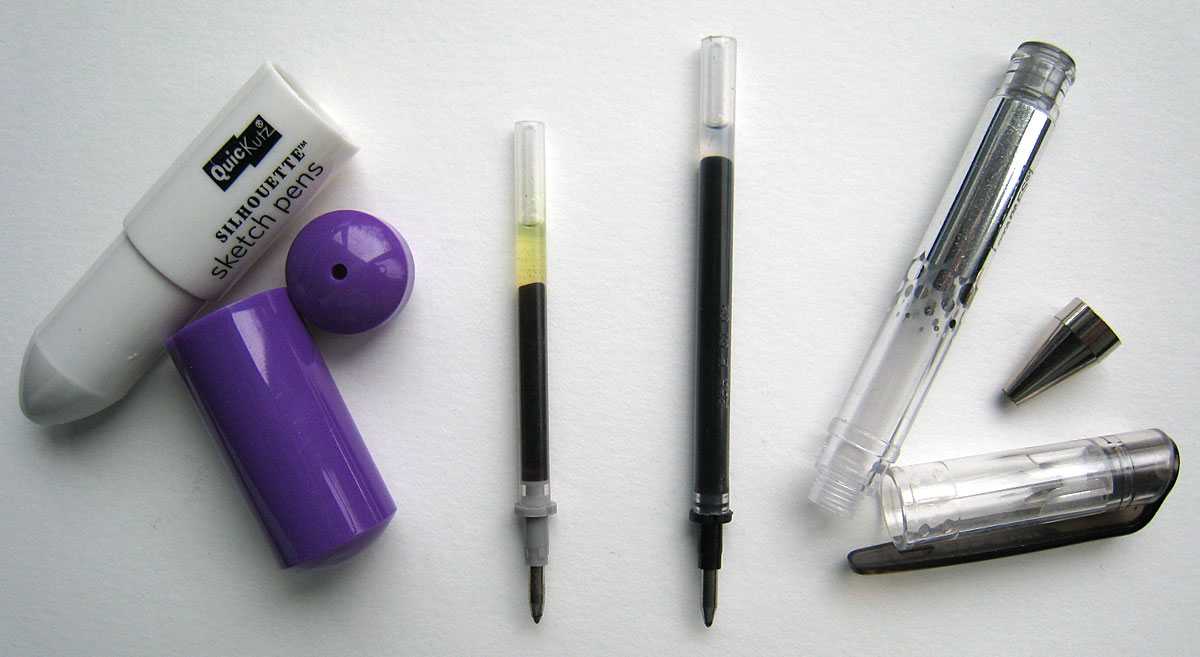
Found a pack of 12 Mini Gel Pens from Staples for $4 and hoped it would fit my pen holder from Silhouette. I was disappointed to see the pen won't go into the holder all the way. The Pentel Metallic Gel Roller fits though!


I took Staples and Silhouette pens apart and realized the Staples pen length was longer, but other than that it was about the same as Silhouette's pens. So I stuck the cap on top and taped the whole thing to prevent it from moving. After my Silhouette pens run out, perhaps I'll just cut down the Staples length and that will be my instant refill.

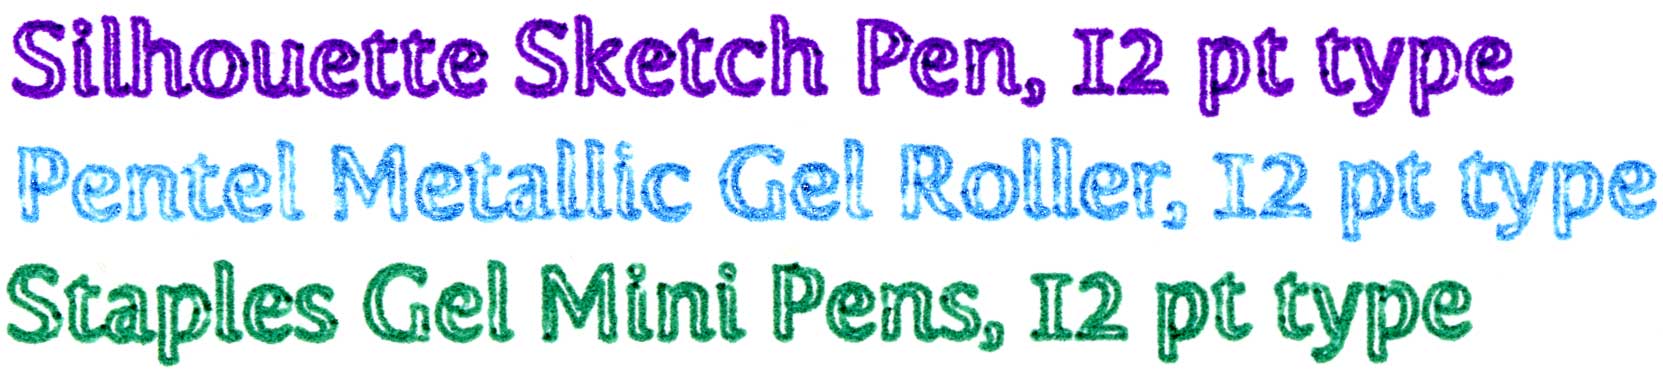
Here are the comparisons of all 3. Just click on the thumbnails to see a good enlargement of the details.